What is Windows Timeline?
We already have the Task View feature in Windows 10 where we can check all the running apps, now with the new Timeline, you can check the apps you were working previously. All your activities will be listed day-wise/ hour-wise, and you can scroll down to check all your earlier activities.
1 What is Windows Timeline?2 How to enable the Timeline in Windows 102.1 Using Timeline Feature2.2 Remove items from Timeline2.3 Disable Timeline Feature
If you select a particular day, you can then check the activities hour-wise. You can also clear all your activity logs from a particular day or hour. It will quickly become your go-to method for opening files you were previously working on or sites in Edge you previously visited. The timeline feature will be accessible via the multi-tasking button next to Cortana, and the button itself has a new look. Once enabled, this feature will keep track of what you had been doing on your Windows 10, the files you access, browsers (Edge only), folders, apps and so on. Imagine this has your browser’s history which keeps a track where you had been, and you can jump back right away to that particular app or file from there.
How to enable the Timeline in Windows 10
The Timeline should be enabled by default. However, if it is not, Open the Settings app, go to Privacy and then select Activity History on the left side of the window. Then, look at the right side of the Settings window. To be able to use the Timeline feature and everything it has to offer, you have to check the box that says “Let Windows collect my activities from this PC.” Also, you have to select at least one user account to use with the Timeline. The Timeline will then record and show the activities that you performed while connected to that user account. The Timeline can work on multiple devices and sync your activities from one Windows 10 PC to another. If you want to see your activities from the PC that you are using right now, on your other Windows 10 devices, you must check the box that says “Let Windows sync my activities from this PC to the cloud.”
Using Timeline Feature
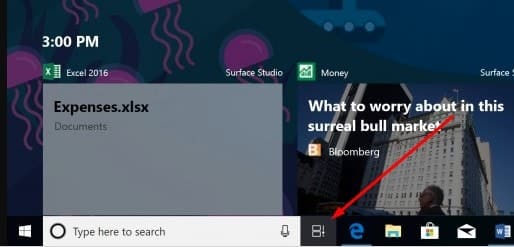
You can open timeline feature on Windows 10 simply by click or tap on its button (looks like a series of empty squares and a tiny scrollbar ) from the taskbar. which should be positioned to the right side of Cortana’s search box. Or you can use keyboard shortcut Windows + Tab keys simultaneously to access the Timeline feature.
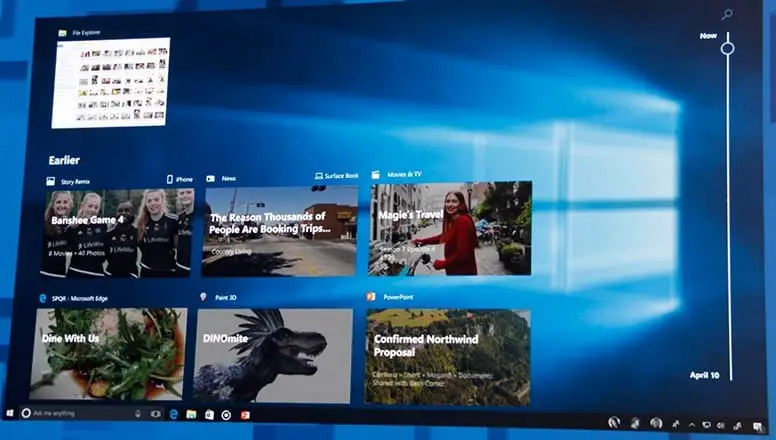
You’ll see your current activities in large snapshots across the top rows and then your previous activities in smaller snapshots below.
Scroll up and down to move through your Timeline or drag the selector on the right-hand side, and you can click on “See all” to open up the view and see all of a day’s activities by the hour. You can click on “See only top activities” to condense the view. There’s also a way to see all the activities that happened in a single day. You need to click the See all link next to the date header. Your activities will be organized into groups by hour to help you find tasks you know you worked on that morning, or whenever. And Click on the See only top activities link next to the day’s header to restore the default view of Timeline. If you can’t find the activity you’re looking for in the default view, search for it. There is a search box in the upper-right corner of Timeline if you can’t easily locate the task you wish to restore.
Remove items from Timeline
The Timeline allows you to remove whatever you don’t want it to remember. When it a timeline, for apps, just hover your mouse over the top-right corner of that listing, and you should see an option to close. Interesting to note that while you can close the apps, you cannot remove them. For files, you will have to right-click and choose to remove. If you want to remove a particular file listing particularly from a day, you can choose the option “clear from Earlier today” or “clear from yesterday” or “clear from a specific date. Sometimes, probably for privacy reasons, you might want to remove a particular activity or even a whole group of activities from your Timeline. If you want to remove only one activity from your Timeline, you can right-click or tap and hold on it and then choose to Remove in the contextual menu. Similarly, if you want to remove a whole group of activities from your Timeline, navigate to that group, right-click or tap and hold on any of the activities in the group, and then click or tap on the option that says “Clear all from [group name].” For instance, if you want to remove all the activities in your Timeline today, you should click or tap on “Clear all from Earlier Today.”
Disable Timeline Feature
If you would prefer not to have your recent activity show up on the Timeline, go to Settings > Privacy > Activity history and turn the toggle switch off for your account under Show activities from accounts. The Timeline is a useful new feature in Windows 10, and many users will probably like it. As you have seen, it can be handy, but some downside we found that we did not manage to find a way to stop it from monitoring a particular app that we choose. That is a negative from a privacy perspective, as some people might not want other people, or Microsoft, to know what videos or photos they were looking at, sometime in the near past. The timeline works better with Microsoft products or apps from the store. If you use Firefox or Chrome as your default browser, Timeline may not accurately track it. It will be the same with PDF readers or another category of software. Windows Store apps, however, are tracked properly. That’s all about Windows 10 Timeline feature. This feature has a lot of promise and users who have tested it on the Insider Builds are impressed with it. This is a part of the upcoming Windows 10 April 2018 Update which comes with a number of new features and improvements to an existing features.
How To Monitor Your Network Data Usage In Windows 10Timeline Feature is not working in Windows 10 version 1903? Here how to fix itHow to disable the Windows 10 Timeline feature


